

The UV Unwrap tool provides an elegant solution to creating UV maps from just about any kind of mesh, from hard surface to organic. To understand the concept of UV Unwrap, simply think about skinning an animal. Sure it's a little gruesome but it's really the best way to think about it. The idea is that we need to cut seams into the skin of the subject so that when we lay the skin out onto the table it lays as flat as possible without much stretching of the skin. With that we have just described skinning an animal and the UV Unwrap function all at the same time.
Usage
The Unwrap tool works best when users first define seams over the models surface that, when unwrapped, define the outer edges of a UV island (a UV island is simply a connected group of polygons in a UV map). Seams are defined prior to activating the tool, by selecting edges in series, the edges themselves become the boundary. A continuous loop of edges over the geometry would define the outer edge for two, separated UV islands, making it easy to unwrap an entire character into multiple islands simultaneously. It should be noted that UV mapping is largely about managing the stretching and distortion that comes with representing a 3D surface on a two-dimensional plane, so some thought should be put into which edges to select for optimal results. It is best to try to hide any seams in the least accessible areas, such as the back of a head under the hair, or under the arms. UV Unwrap will act on any visible foreground geometry, so it may also be desirable to hide any geometry that should not be acted upon.
Once the seams are defined, unwrapping the model is the next step. UV unwrap function is found in the "UVEdit" layout, LMB+click the "Unwrap Tool" button to activate. Next, LMB+click in the 3D viewport to enter interactive mode, LMB+clicking and dragging will increase/decrease the number of 'Iterations', usually the greater the iterations, the better the resulting UV map, though only up to a point. There are a number of options that control how the unwrap is evaluated, and some can have a dramatic effect on the final unwrap quality, since the tool works in real-time (of course depending on the density of the target mesh), many different permutation of settings can be tried to devise the best result. Once a map is defined, additional adjustment can be applied with the 'Relax' tool to often improve the already amazing results produced by the Unwrap tool. When the tool is activated the following options appear in the tool properties panel-
 UV Unwrap--
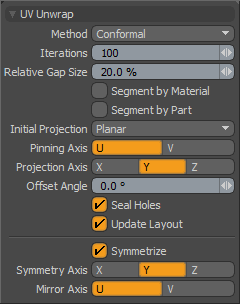
Method: Users have the option to use two different UV unwrapping evaluation methods, 'Conformal' which uses the ABF++ algorithm for angle base flattening, and is good for organic shapes. The 'Angle Based' option uses the 'Least Square Conformal Map' algorithm (as did previous versions of MODO) and can be better for hard surface types of geometry. Try them both and see which option produces the most desirable result.
Iterations: This value determines the number of iterations for the global solver to run across the UV data. Basically this is the "amount" of unwrapping. With the value set to zero the UV view will appear just as if you simply used a UV projection method based on the 'Initial Projection' and the 'Projection Axis' settings for the tool. Increasing the 'Iterations' will unwrap the data, the number of iteration necessary is largely dependent on the complexity of the target mesh.
Relative Gap Size: If your UV data has multiple islands (contiguous geometry pieces) there needs to be some amount of gap left between these UV "chunks". The Relative Gap Size dictates how much space will be forced between the UV boundaries. Increasing this value will push the UV data further apart as well as scaling the resulting UV data down to accommodate the needed space.
Segment by Material: If you are unwrapping a contiguous mesh that has different materials assigned to various polygon groups you can use these groups to create continuous UV sections while unwrapping. This option provides a quick way to unwrap a single mesh into several UV segments which can either be left in a single UV map or pasted into separate UV maps if desired.
Segment by Part: This option is identical to 'Segment by Material' with the exception that it uses the 'Part' tags from the polygons.
Initial Projection: This popup choice determines how the initial UV projection will be created. The options are Planar, Cylindrical, Spherical, Use Current Map and Group Normal. The first three settings also rely on the Projection Axis.
Planar-- Planer projection will project the 3D model into UV space based on a simply plane that is projected across the model in the user defined axis.
Cylindrical--
Cylindrical creates a virtual Cylinder around the mesh
Spherical--
Spherical creates a virtual sphere for the projection. For more information about the Projection Modes see UV Create Tool.
Use Current Map--
The Use Current Map option uses the current state of the UV map as a starting point rather than projecting new UVs. This is very useful if you already have created some reasonable UV map and want to use Unwrap to further refine the UVs without destroying your hard work.
Group Normal-- Group Normal uses the average normal of the selected polygons to determine the initial projection plane. This can be useful on geometry that is mostly facing the same direction but will give less than useful results when the mesh is complex and has many overlapping areas. If you want to see in 3D the axis that would be chosen for the Group Normal option you can hover your mouse over the 3D viewport and press 'Ctrl-A'. This will align the viewport to the average normal of the selected polygons.
Pinning Axis: The 'Pinning Axis' determines the UV axis to favor when shuffling the UV boundaries during the unwrap. U is the horizontal axis and V is vertical.
Projection Axis: The 'Projection Axis' defines the axis orientation for the 'Planar', 'Cylindrical' and 'Spherical' planar projections.
Offset Angle: This value allows you to add some rotation to the resulting unwrapped UVs. This can be very useful if your original mesh is not world axis aligned. By adjusting this value you can see in real time the effect on the map.
Seal Holes: If the target mesh is not "water tight" (such as a head with open eye sockets) the Unwrap algorithm can sometimes have difficulty resolving these areas. The Seal Holes option will create a virtual polygon to close the holes and improve the unwrapping effect.
Update Layout: This option forces the UV layout to remain within the 0 to 1 UV coordinate space.
Symmetrize: When UV unwrapping a perfectly symmetrical mesh, such as a character, the 'Symmetrize' option can be enabled to produce a likewise perfectly symmetrical UV map. To use, enable 'Symmetrize' option and then define the 'Symmetry Axis' that the originating mesh is symmetrical across and the 'Mirror Axis' defines the UV axis that the result should be symmetrical against. It may be necessary to increase the number of 'Iterations' to make the mesh fully symmetrical.
Symmetry Axis: The 'Symmetry Axis' defines the axis that the originating mesh is symmetrical across.
Mirror Axis: This option defines the symmetry axis that the resulting unwrapped UV should mirror across, generally this setting will be the same as the 'Pinning Axis'.

