
The Gradient Editor lets you control Gradient textures in MODO. Gradients are useful in modifying values gradually across a certain parameter such as along a surface based on length or based on its angle. Gradients can also be used to drive other layers for complex texturing. It is all dependent on the Effect that is selected and the Input Parameter. Samples of many of the most common input parameters are provided on the Gradient Items page of the documentation.
Usage
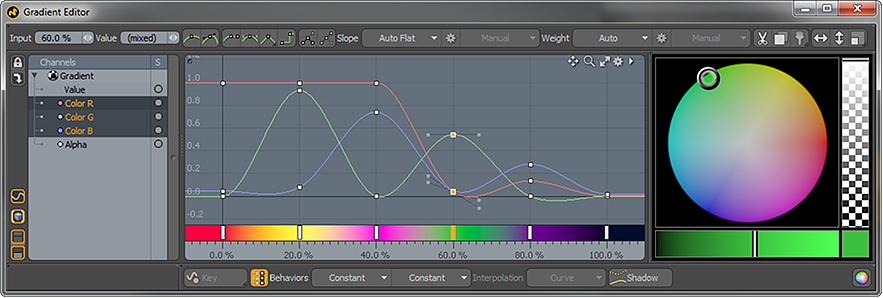
A Gradient layer is added to the Shader Tree using the 'Add Layer' button under "Processing > Gradient". Once created, users will need to assign the appropriate 'Effect' it will have on the target surface. For more information on working with Shader Tree layers, please reference that page of the documentation. With the gradient item selected, in the Properties panel, users will next need to select the Input Parameter controlling how the gradient modulates the surface it is applied to. By clicking the 'Edit Gradient' button one can open the Gradient Editor window. The 'Gradient Editor' is in many ways similar to the Graph Editor, the only difference being the graph editor modifies values over time. It will be helpful as well if users are familiar with the Color Picker as its use is integral for selecting color values.
Channels
From within the 'Channels' section on the left side, users can select the appropriate value(s) they wish to modulate. This is dependent of the desired effect, for Diffuse Color this would be the 'Color R,G and B channels, for Specular Amount this would be the 'Value' channel (any input that requires a single percent will be a 'Value' graph). Once selected, a line representing the numerical value of the channel appears in the graphing window for adding keys.
Channel Visibility
Along the right side of the viewport are some toggle buttons that control the visibility of the channels.
| When enabled will only show channels in the channel view that have existing keys. | ||
| When enabled will only show channels in the channel view that are part of the selected 'Group'. | ||
| When enabled will show transform channels for items. | ||
| When enabled will show standard item channels. |
Key Creation
Keys can be added to the currently selected curve(s) by MMB clicking either on the curve itself or anywhere on the background. Alternately users can use the 'Ctrl+Alt+LMB click' to create key. Key values will be created at the location of the cursor. The 'Input' and 'Value' numeric fields in the upper left corner will allow for precise numerical editing of selected keys.
Key Selection
Selecting a key can be done by LMB+clicking with the cursor directly over the key itself, holding the 'Shift' key while selecting adds to the selection, and holding the 'Ctrl' key removes a key from the selection set. Clicking on the editors background deselects all keys.
LMB+click drag on the background starts box marquis selection, drag out a box to enclose the keys you want to select and release the mouse button. All keys within the box will become selected, any outside the box will be deselected. Holding down the 'Shift' key adds the keys within the box to the selection while the 'Ctrl' key removes them.
Setting Colors for Keys
The color of selected keys can be set or adjusted by either clicking and dragging on a Color Picker viewport or from the RMB context menu. Selecting 'Key Color' from this menu will open the Color Picker from which a color may be chosen. In both cases additional keys may be created on associated curves at the key Input value. LMB+clicking the corner swatch for the color will open the system color picker.
Deleting Keys
Keys can be deleted from curves in two ways: To delete only the currently selected keys press the 'Delete' key, to delete the currently selected keys and keys at the same Input value on associated curves select 'Delete Key' from the RMB context menu.
Editing
LMB+click drag on a key selects the key if it's not already selected and allows quick editing of both Input & Output values at the same time. If there are several keys already selected and you click drag on one of them then all the selected keys will be modified.
MMB & Drag on a key works in a similar way except that editing is constrained to the Output value. Similarly RMB & Drag constrains the edits just to the Input Parameter value.
MMB+click drag vertically on the background adjusts the Output value of all selected keys.
RMB+click drag horizontally on the background adjusts the Input value of all selected keys.
'Ctrl'+MMB+click drag on the background provides constrained editing of Input & Output values for selected keys based on the initial direction of movement.
LMB+double click on a key selects all the keys on the curve.
Context Menu
The Gradient Editor context menu is accessed by RMB click & release. If the cursor is over an un-selected key when the menu is opened the key will be added to the selection. Operations performed from the context menu will affect all the currently selected keys.
Navigation
Panning & Zooming behavior in the Gradient Editor is similar to the 3D viewports with a few additions:
Alt-MMB Drag adjusts the start value of the Input (horizontal) range displayed in the editor, while Alt-RMB Drag adjusts the end value of the Input Range.
Alt-Shift-MMB zooms the Output Range displayed in the editor, while Alt-Shift-RMB zooms the Input Range. In both cases the zoom is centered on the initial cursor location.
Alt-Control-RMB provides box zooming.
Mouse Wheel - Zooms in and out around the cursor location.
Modifying Curves
 The Gradient Editor also offers a lot of control over how values interpolate from one key to the next. This is represented by the curve/line that connects each key. By default the values gradually fade from one to the next- this is the 'Auto' setting. Users can adjust the key settings so incoming and outgoing lines are smooth, linear, stepped or a variety of other shapes. Small Bezier-like handles appear next to selected keys that allow users to make these adjustments. LMB+click and drag the handle modifies it, putting it in to the 'Manual' mode. The handles relate to the key in two ways, there is the angle of the handle called 'Slope', and then the length of the handle called 'Weight'. These two options combine to produce the final shape of the curve. There are some buttons to quickly set the most common Slope and Weight combinations--
| Sets the selected keys to 'Auto' for both Slope and Weight. | ||
| Sets the selected keys to 'Manual' for both Slope and Weight. | ||
| Sets the selected keys to 'Auto Flat' Slope and Auto Weight. | ||
| Sets the selected keys to 'Flat' Slope with Auto Weight. | ||
| Sets the selected keys to 'Linear' with additional submenu options (RMB+click) for 'Linear In' and 'Linear Out'. | ||
| Sets the selected keys to 'Stepped' Slope with 'Auto' Weights. |
![]()
The next group of buttons gives full control over both handles for each key- the incoming handle and the outgoing handle. You can think of the buttons representing the left side handle and the right side, where the setting is directed to each side, independent for the 'Slope' and 'Weight'. If the handle is unified, meaning adjusting one side moves the other in a straight line, then the outgoing settings will be grayed out. The option gear in the middle allows users to 'Break' the handles or 'Unify' them, and to zero out the angle which makes them perfectly horizontal again. There are a number of settings under the popup menu when clicking any of the buttons-
Slope
Manual- Give user full control over Slope (handle angle).
Auto- Automatically adjusts Slope to produce a smooth ease-in and ease-out from the previous key value to the next.
Linear In- Angles the Incoming Slope to point toward the previous key producing a straight line between keys.
Linear Out- Angles the Outgoing Slope to point toward the next key producing a straight line between keys.
Flat- Sets the Slope to 0 degrees flat regardless of the positions of the previous and next keys.
Auto Flat- Acts just like 'Auto' except when the incoming or outgoing keys match the value, then it acts like 'Flat'.
Stepped- Eliminates the Slope and Weight altogether, retaining the previous key value up until a new key is introduced.
Weight
Manual- Give user full control over Weight (handle length)
Auto- Automatically adjusts Weight to produce a smooth ease-in and ease-out from the previous key value to the next.
The following buttons also allow users to quickly break or unify the handles Slope and Weigh in a single stroke.
| Breaks the key handles for adjusting Slope and Weight | ||
| Unifies the handles for adjusting Slope and Weight. |
Managing Keys
The Gradient Editor also offers some useful functions for working with key values. Working with a clipboard buffer users can move keys around and even move them from one channel to another. The 'Paste' command simply adds the key values to the target, the 'Insert' command adds them to the target and moves other keys as necessary, while 'Replace' adds the keys removing any existing keys it might overlap.
| Cuts the selected keys from the editor and stores them in a temporary buffer for later access. | ||
| Copies the selected keys from the editor and stores them in a temporary buffer for later access. | ||
| Pastes the keys stored in the buffer with additional submenu options (RMB+click) for 'Insert' and 'Replace'. |
The following buttons open dialog boxes that allow for easy gang editing of multiple selected values-
| Opens the 'Set Input Value' dialogue panel for adjusting the time position (not directly applicable to Gradients). |
![]()
Time: Determines the position in time to move the selected keys to.
Absolute: When enabled, Absolute time is used, where a specific time can be defined, when disabled the time will be relative to the current time position.
Linked: When enabled linked keys (such as those of the R,G,B channels) will remain linked in the same relative position, even if only a single channel is edited. When disabled keys can be moved freely.
Ripple: When enabled all following values of those selected will be shifted by the same amount.
| Opens the 'Set Key Value' dialogue panel for adjusting the value of the selected keys- |
![]()
Value: Defines the new value that will be applied to the selected keys when mode is set as 'Set'. Defines what value is added when mode is set to 'Add'.
Multiple by: Acts as a multiplier of the selected values when mode is set to 'Multiply'.
Mode: Determines how the values will affect the selected keys- 'Set', 'Add' and 'Multiply'.
| Opens the 'Scale Keys' dialogue panel for scaling the value of the selected keys- |
![]()
Scale: Defines the amount of scaling applied to the selected keys.
Center Options: Determines the center location to scale the keys from, which are self-explanatory- 'Start', 'Center', 'End', 'Time' and 'User'. When 'Time' or 'User' is selected, the 'Center Value can be used to define the specific center.
Center Value: Determines the specific center locations when the 'Time' or 'User' options are selected as the 'Center Option'.
Mode: Two modes to determines which direction gets scaled- 'Input' scales the interval (horizontal) while 'Output' scales the value (vertical).
Link: When enabled linked keys (such as those of the R,G,B channels) will remain linked in the same relative position, even if only a single channel is edited. When disabled keys can be moved freely.
| Opens the 'Key Invert' dialogue panel for adjusting the value of the selected keys- |
![]()
Mode: Two modes to determines which direction gets inverted- 'Input' inverts along the interval (horizontal) while 'Output' inverts along the value (vertical).
Local: When the 'Local' option is enabled the inversion will happen individually for each channel, when disabled, the inversion will happen as a group for all that is selected.
Behaviors
![]()
The Behavior buttons define the incoming and outgoing curves that are outside the area of defined keys. The left button defines the per-behavior and the right button the post-behavior.
Constant- Values remain the same. With the 'Auto' Slope and Weight option will ease-in or out as it transitions to the key values.
Stop- Values remain the same. For 'Auto' Slope and Weight transitions to the key values act as if Linear, a sudden transition.
Linear- Value projects outward linearly from the first or last key providing a constant offset.
Repeat- Values of keys are repeated. When incoming and outgoing values match, a loop can be created.
Oscillate- Values are repeated in forward sand then reversed, like a ping-pong type effect.
Offset Repeat- Values of keys are repeated, but each subsequent repeat is offset by the amount of the last key.
Reset- Values are set to flat 0 (zero) outside the key area.
| When enabled associated keys (such as the the three R,G and B color channels) will remain at the same interval relative to each other, even if only a single channel key is modified. When disabled keys can be freely moved individually. | ||
| Opens the color picker for defining color specific keys. |

