
The recoil Soft Body item is governed by the recoil solver. Users should reference that section of the documentation for information on dynamics and simulation. The Soft Body Influence allows users to deform geometry as if it were made of a soft, pliable material. Unlike Rigid bodies that do not deform at all, soft body items are calculated as if springs were attached between adjoining vertices, providing a flex and stretch type warping of the surface. With it, it is possible to simulate a wide variety of materials by adjusting the various properties, from soft billowy fabric, to wiggly gel-like surfaces, to stiff cardboard-like surfaces. With the addition of Pin Maps, Soft Bodies that react to animation are also possible, such as the thin flexible membrane surface on a bat wings as it flies, the Deformation of the wings flapping is applied through a Skeleton and Joint animation, with the secondary membrane motion applied as a Soft Body, utilizing a Pin map.
Apply Soft Body Deformer
Applying a Soft Body deformer only requires that the target mesh item be selected, then simply LMB+clicking the 'Make Soft Body' button in the 'recoil' submenu, of the toolbox in the 'Setup' and 'Animate' interface tabs. This applies the 'Soft Body Influence' item, linking it to the mesh. From there, users can access the attributes of the item within the 'Properties' panel. In order to see the results of the Soft Body deformations users will need to 'Run a Simulation', this action actually calculates the deformations based on the settings of the Deformer. For more information on working with dynamic items, please reference the recoil overview page of the documentation.
 Name: This data field displays the current item name. Users may easily change it by LMB-clicking within the field and typing the new name.
Enable: Toggles dynamics on and off for the item. When enabled, modo will calculate dynamics for the item when the timeline is played (or the 'Run Simulation' command is invoked). When disabled item will be ignored for dynamics and collision calculations.
Self Collisions: When enabled, items will be able to collide with themselves (such as when one end of a sheet is passing through another). This option is only necessary for surfaces that inter-penetrate, as it will slow down the simulation.
Pin Map: A 'Pin Map' is simply a Weight Map (or Weight Container) that controls what areas of a surface are affected by the Soft Body Deformations. Limiting them to specific areas can be useful to create a wide variety of organic effects, such as adding secondary motions to characters. Vertices are either fully pinned or not pinned, as every non zero value is treated as a 1.0 value (values aren't attenuated).
Mass: The 'Mass' option controls the overall mass or weight applied to the item. The amount entered is divided by the number of vertices and the same amount is applied each one.
Mass Map: The 'Mass Map' is simply a Weight Map (or Weight Container) that controls how the mass value is applied to the mesh per vertex. The Vertex Map values are normalized by the Mass value. Example: if the 'Mass' is 5.0, and in the mass map there are three vertices with weight values of 1.0, 0.5, 0.5, those vertices would masses of 2.5, 1.25, 1.25
Blend: The 'Blend' option controls how much of the mesh moves toward the simulated positions. A value of 100% means that the points in the mesh exactly match the simulated positions attenuating towards 0% where item would not deform at all (and act as if pinned).
Blend Map: The 'Mass Map' is simply a Weight Map (or Weight Container) that controls how the 'Blend' value is applied to the mesh per vertex.
Pose: The 'Pose' option controls to what degree a surface tries to maintain its original, undeformed shape (this differs from 'Blend' in that Blend maintains the original vertex positions, while 'Pose' maintains the original shape).
Pose Map: The 'Pose Map' is simply a Weight Map (or Weight Container) that controls how the 'Pose' value is applied to the mesh per vertex.
Margin: The 'Margin' determines a distance away for the surface that is added to the size of the object, useful for controlling collision detection.
Drag: The 'Drag' option determines the loss of energy on a surface that is in motion (say for jiggling type of effects).
Pressure: The 'Pressure' value exerts a force upon the overall volume of an item, similar to how pressure would react on an object in the real world, increasing values would add overall volume, inflating it and decreasing (negative) values would reduce its volume, deflating it. This option requires that the target mesh be completely watertight (no seams).
Volume Conservation: The 'Pressure' option tries to maintain an overall internal volume during the deformation simulation. So, if one side of an object is squashed, the other should balloon out. This option requires that the target mesh be completely watertight (no seams).
Friction: The amount an object will slide against another object. A value of 0.0 would offer no resistance, while a value of 1.0 would keep the object from sliding entirely.
Springs--
The Springs controls the rigidity of the object, and determine wether of not it is stiff or squishy and to what degree the surface maintains its original, undeformed shape. There are three types of springs that all provide different types of structure to the surface.
All spring values are defined by the base value multiplied by the value in any associated Weight Map, if it has one.
 Structure Springs |
 Shear Springs |
 Bend Springs |
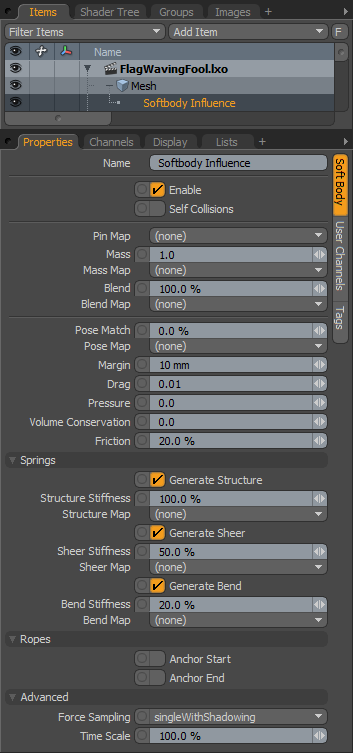
Generate Structure: When 'Generate Structure' is enabled, springs are generated that follow along the lines of the mesh, connecting the vertices along their polygon edges.
Structure Stiffness: This value determines how resistant the Structure springs are when deforming, depending on the value, they can be very rigid or very pliable.
Structure Map: With the 'Structure Map' option, users can assign a Weight Map that modulates Structure Stiffness as a multiplier. If 'Structure Stiffness' is set to 50%; with a Weigh Map value of 0.6 (60%), the final calculated Stiffness value would be 30%.
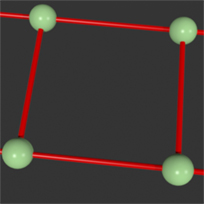
Generate Shear: When 'Generate Shear' is enabled, springs are generated that add extra connections to the inside of a face, on a quad polygon, the springs will form an 'X' shape. In a triangle, no additional springs are created. In an Ngon, a spring connected to each non-neighboring vertex. These springs help prevent the polygon from collapsing in on itself.
Shear Stiffness: This value determines how resistant the Shear springs are when deforming, depending on the value, they can be very rigid or very pliable.
Shear Map: With the 'Shear Map' option, users can assign a Weight Map that modulates the overall strength of the Shear as a multiplier. If 'Shear Stiffness' is set to 50%; with a Weigh Map value of 0.6 (60%), the final calculated Stiffness value would be 30%.
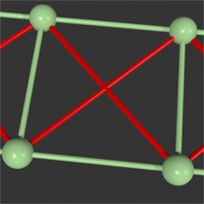
Generate Bend: When 'Generate Bend' is enabled, springs are generated that help an object maintain it's shape, following along the Structure Springs. These springs work to maintain the shape of the object by applying rotational force to maintain the continuity of the surface.
Bend Stiffness: This value determines how resistant the Bend springs are when deforming, depending on the value, they can be very rigid or very pliable.
Bend Map: With the 'Bend Map' option, users can assign a Weight Map that modulates the overall strength of the Bend as a multiplier. If 'Bend Stiffness' is set to 50%; with a Weigh Map value of 0.6 (60%), the final calculated Stiffness value would be 30%.
Ropes--
Ropes are Soft Body deformations applied to modo curves. These can be Curves , Bezier Curves, curves used as Hair Guides, or rendered curves utilizing the Item attribute.
Anchor Start/End: The 'Anchor Start' and 'Anchor End' options are simple toggles allowing easy pinning of either the start or end point of a curve (or both). See 'Pins' above for information on what Pinning is.
Advanced--
Force Sampling: Determines how force values are sampled and applied to the mesh--
single- A single call is made to the force and it is applied evenly to all vertices in the mesh.
singleWithShadowing- A single call is made to the force(from the objects center) and it is applied evenly to all vertices in the mesh. Intervening shadow items will modulate the force amount.
perVertex- Forces are queried individually for every vertex, based on it's current position.
perVertexWithShadowing- Forces are queried individually for every vertex based on it's current position. Intervening shadow objects will modulate the force amount.
Time Scale: Generally a simulation moves items in time based on real world values of simulated forces. Users can use the 'Time Scale' option to adjust the speed at which a simulation runs, per soft-body, simulating slow-motion or super-speed effects when the value is lowered or raised respectively.

